Campaign Settings
The campaign settings dialog consists of four main functions. Here you activate your RED license by connecting to your CoffeeCup account. By logging into S-Drive you'll be able to access updates, to the email generator and online image storage.
This is also where you connect RED to email accounts for sending (test) emails and where recipients and test lists are maintained.
To launch the Settings click on the Campaign Settings toolbar icon.
Contents in this chapter
General Tab: Connect to S-Drive
RED was specially designed to work flawlessly with S-Drive Mailer to help streamline the development process by keeping all project images organized and stored. Moreover, Mailer provides super speedy email processing powers. Plus, it includes access to the latest email-making scripts and markup which help ensure your emails are compatible with the always-evolving design standards that email clients release each month.
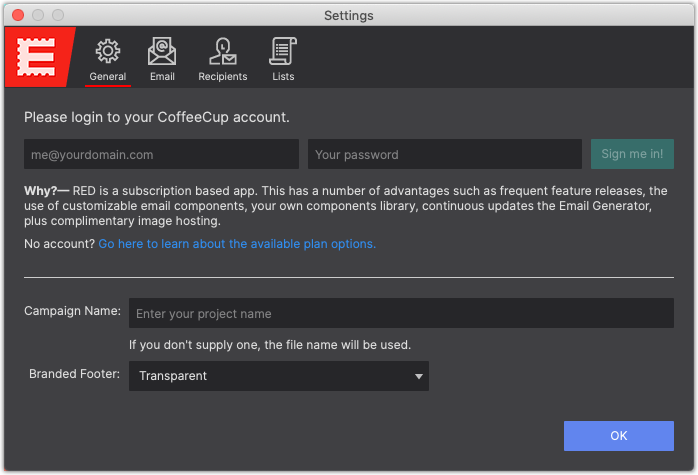
To select an S-Drive address, go to Campaign Settings > General and log into your CoffeeCup account. If you have not create an S-Drive domain name, then click the blue link that says 'Come over and create your address here'. After you create a name, when you export the design the image files will be uploaded to the server so that they can be viewed online in the email.
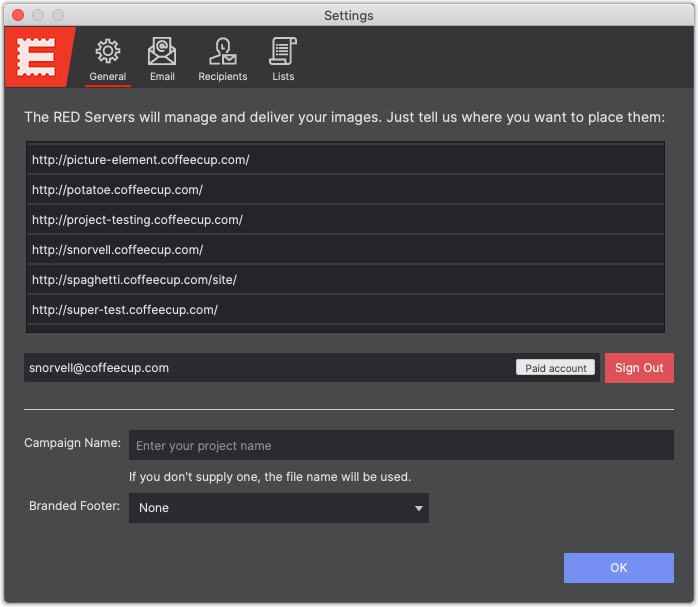
From the General tab you can also provide your campaign a name, or edit the branded footer.
With the trial, you'll be able to send/export three designs. After that, you'll need to activate your license to be able to continue crafting awesome emails.
Email Tab: Setting Up SMTP
While we’re not in the mass email sending business (just yet), you can connect to your personal or business email to send to individuals and small groups. Most importantly you may send tests of the email so you can evaluate the design across various mail clients.
Testing the email is very important. That's because each mail client is governed by their own set of rules for displaying HTML. There are many design aspects not universally supported like fonts, shadows, spacing, even backgrounds, just to name few. This is a huge reason why email design has always been so tricky. Lucky for you, RED makes it easy to accommodate these display discrepancies with fallback options so you can control the appearance on the unsupported clients.
If you don’t already, we suggest creating email accounts with all the major players. This way you can access the design within different browsers, mail clients, and devices and take note of what needs to be tweaked. Better yet, sign up for Litmus and you can run your projects through a wide variety of emil clients and devices all at once.
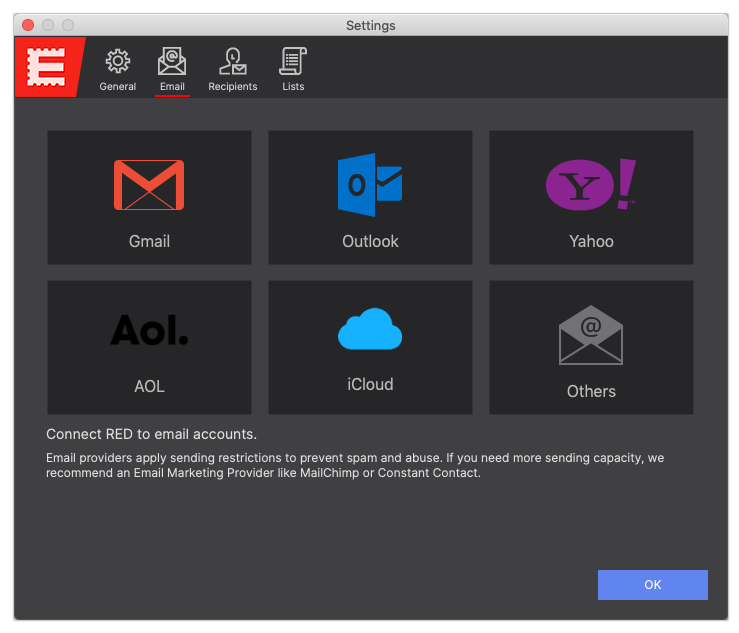
Sending test emails through RED requires a few things to be configured before you can start the process; first you need to configure an SMTP server and second, define who you want to send the emails to.
To configure your mail testing delivery info begin by clicking the Campaign Settings gear icon located in the top menu. In order to send, you will need to configure an SMTP server which will be used to send the email.
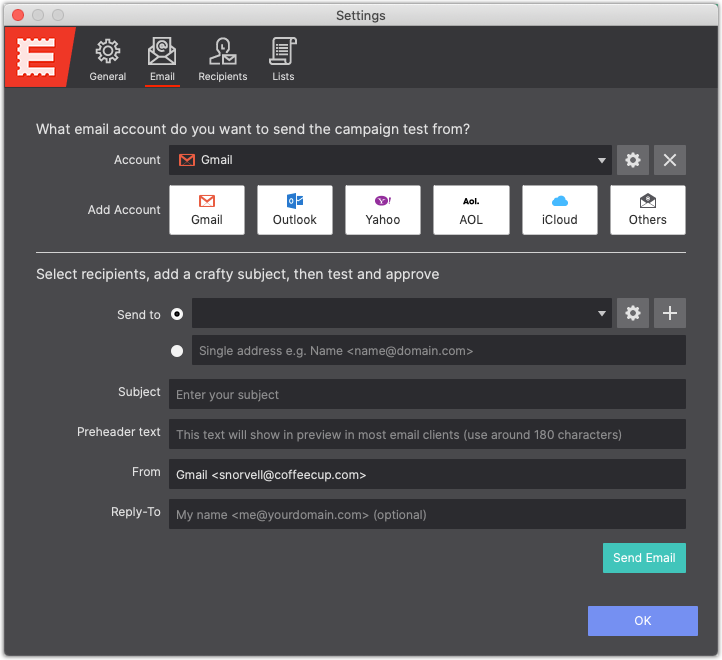
To do that go to Email to begin your send configurations. Select from Google, Outlook, Yahoo, AOL, iCloud depending on who is your email manager. Using another email provider? Choose Others to configure the SMTP settings for alternative clients. After you save the account configurations, use the Account drop down menu, to select the email account you want to test from.
With the integrated Google Sign-in authentication, you can simply log into your Gmail account directly within Email Designer’s settings.

The account description identify this email account by giving it a unique nickname. Then, enter the email address you want to connect to along with it's correct password. Once you have done that you can test the setup. Click the Test Setup button and it will check to make sure that your email settings are entered correctly. If you get the greenlight then you are good to save the setup. A test email will be sent to the address configured.
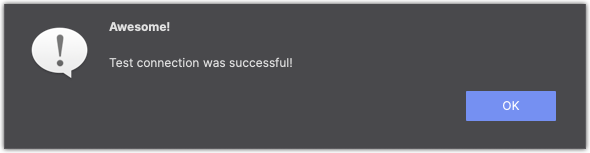
If everything is correctly configured, you would see this appear. Click OK to close the dialog and then click the Save Setup button.
NOTE: Gmail secure app access
If you recieve a popup stating that Gmail can not be setup as it is a less secure app. Please see the article Allowing less secure apps to access your account.
This will get you fixed up and ready to send!
Email Tab: Sending the Email
When sending emails, you have a few different options available to you. You can use Lists to send test emails to multiple users, or you can send test emails to just a few people.
Once you have added your SMTP information (shown above) you can send the test email. To do that, click the Campaign Settings icon and then go to Email. Under the "Send to” option, you can select the radio button for "Default List" or “Single address".
If sending from a list you will need to set the list using the gear icon located next to the list dropdown. If sending to a single address, simply enter the email addresses you would like to send the test email to. You can use just one email address or multiples separating each with a comma.
There are a few other things you should do before sending your test. First would be to enter a Subject, as without one your email may be treated as Spam, and as we all know choosing a good subject is extremely important.
Then, you want to add your Preheader text. Which shows below the email subject. This gives your email some description without it needing to be opened. The more appealing the text is, the more likely you will receive an open.
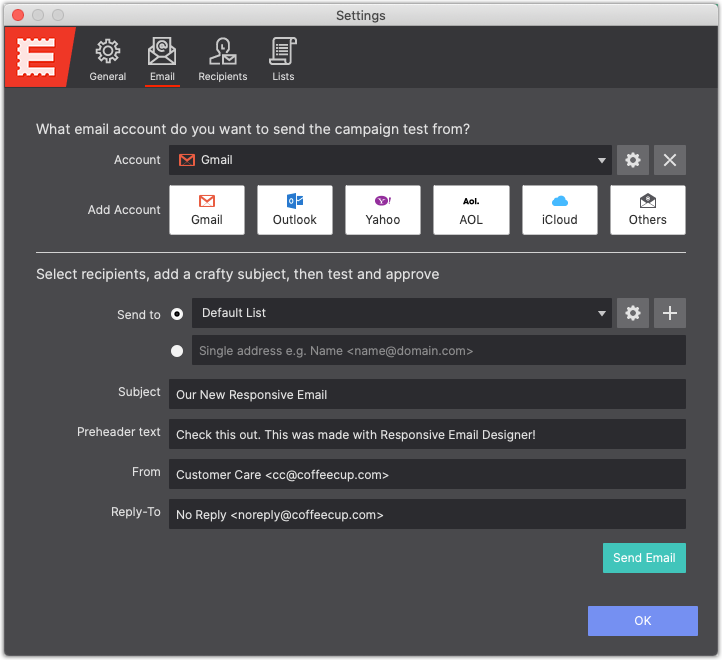
Lastly, you must enter the email address that you would like the email to be sent as. (This should be prefilled, but if not) Only one email address can go here, and it should be formatted as shown.
Now that everything is all configured click Send test. If you have not logged into your CoffeeCup Account, you will be prompted to do so now.
Setting Up Lists & Recipients
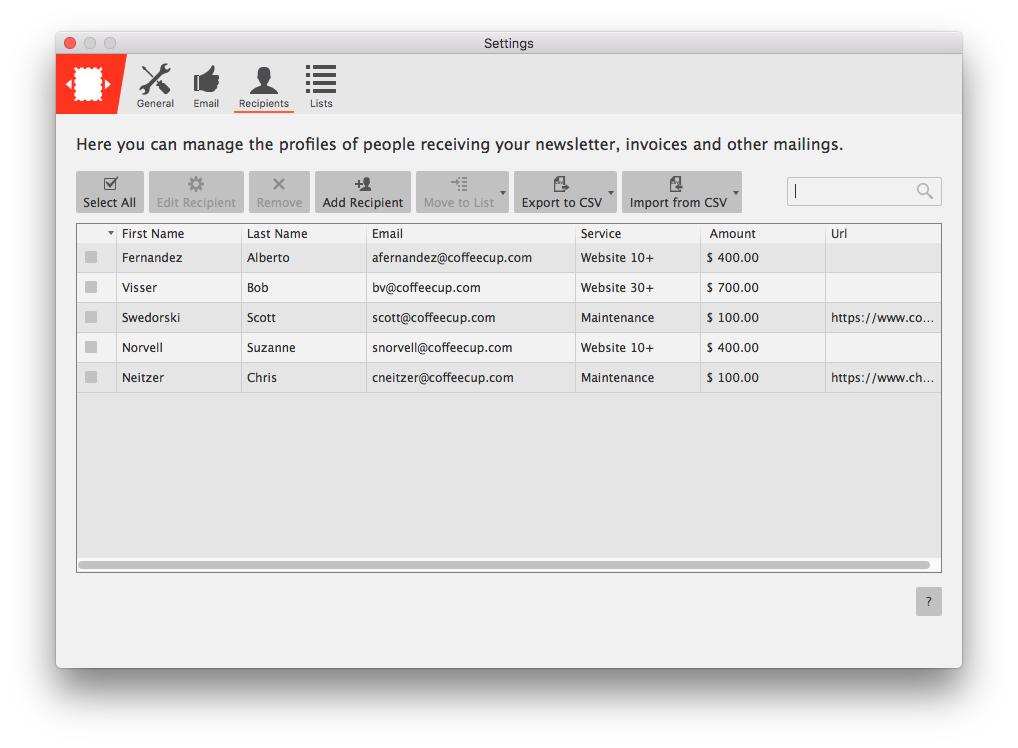
There are two features in RED that help you send test emails out; Recipients and Lists. Recipients are like your address book. Here you can configure people that you want to send emails to. Each recipient then can belong to a list and become a subscriber.
For example, say you have 20 people in your company, and 5 of them are managers, 10 are staff, and the other 5 are in marketing and sales. You can create three lists (Staff, Managers, and Marketing) for these and adding the corresponding recipient to the list.
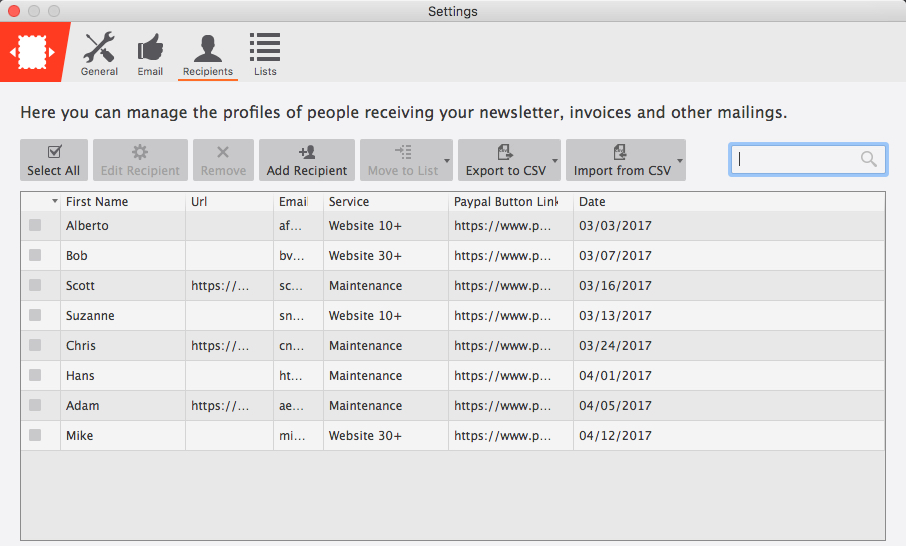
To add a new recipient, click Campaign Settings, and then the Recipient icon. From here you can setup different recipients, that can be later added to a list. To add a recipient, click the +icon. Right now, RED allows you to enter a bunch of different information for each. When you are done, click Save Recipient. Continue adding all your recipients.
Now you need to assign recipients to a list. A recipient can be in as many lists as you like. Lists allow you to group recipients into categories making it easier to send test emails to lists instead of individual people. To add someone to the list, click the + icon and select Add existing recipient.
To add a new list, click the Lists icon and then the +icon. Now enter the List title and a short description of the list.
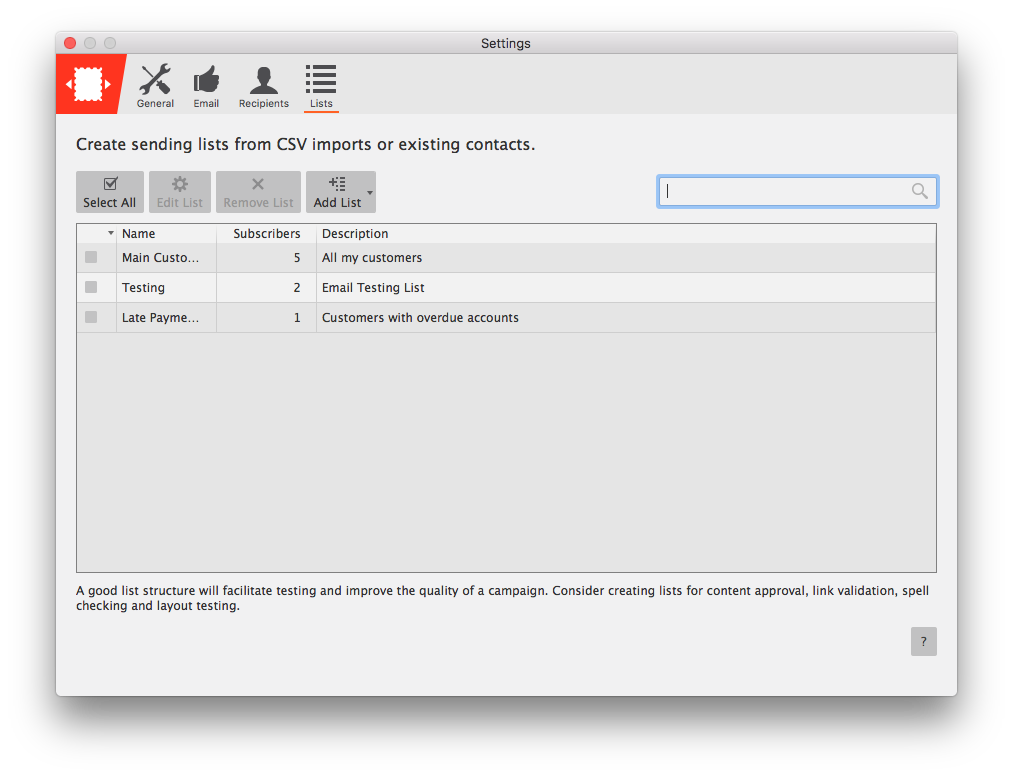
All your recipients will now appear. Check the boxes next to the ones you want to add to this list and then click the Add Existing Recipients button and then click Save List.
CSV Import & Export
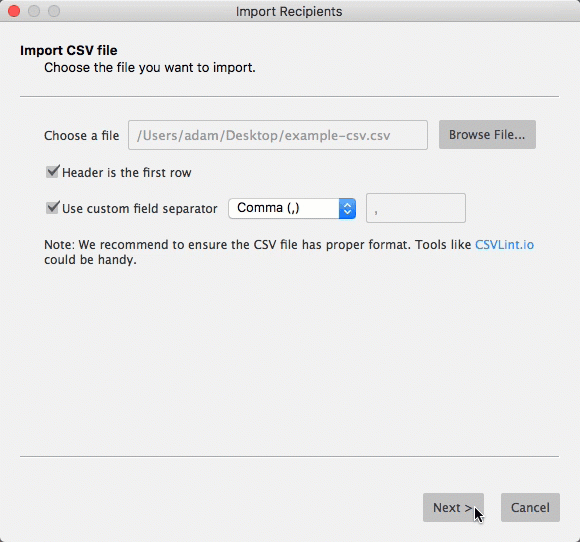
Before getting started, it's important to make sure your CSV file is formatted properly. In order to import a .CSV file into RED, the values in the file must be organized in a certain order. Each value must be separated by a Comma (,) or semicolon (;) Colon (:) Tab (/t) Pipe (|) or other. If you do not know which format your CSV file has, you can use a service like CSV Lint to validate your CSV file before import.
Once your CSV file is ready, go to Settings and click on the Recipients tab. Then choose the Import from CSV icon. Here you will find all the lists you have added. Select the list you want to import the recipients into, or choose no list, if you do not want the recipients added to a list.
Now, you can browse for the CSV file and match the fields in your CSV file with those found in the app. You can choose to ignore all fields except for the email address, as that is a required field. If a field does not have a matching field, then you can choose to add a new field. Once all fields have been matched, click Finish and all the recipients are ready for use.
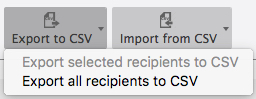
To export your recipients open Settings and choose the Recipients tab. If you are only wanting to export a few recipients, you will need to select them before clicking the Export to CSV button. Choose the option you wish to use, and simply tell the app where you want the file to be saved.
To add a new list, click the Lists icon and then the +icon. Now enter the List title and a short description of the list.
All your recipients will now appear. Check the boxes next to the ones you want to add to this list and then click the Add Existing Recipients button and then click Save List.